Table of Contents1. System Requirements 2. Installing Trials 2 3. Activating Trials 2 4. Playing 5. Profiles 6. Teams 7. Chat 8. Settings 9. Uninstallation 10. Trials News & Upgrades 11. Getting Help 1. System Requirements1.1 Minimum System Requirements
1.2 Recommended System
2. Installing Trials 2
Start the installer executable file. The installation wizard will guide you through the installation process.
The installer will automatically install OpenAL library if not present, and upgrade Microsoft DirectX if necessary.
Running the installer requires Administrator priviledges on the computer.
3. Activating Trials 2
When Trials 2 Second Edition is started, it asks for an activation key. You can try the demo version without a key by pressing the button "Evaluate demo".
The demo version has a limited number of tracks, and many functions are not available, e.g. you cannot send highscores to the server.
4. Playing4.1 Starting the Game
To start Trials 2 Second Edition, select the "Play Trials 2 Second Edition" shortcut from the Windows Start menu. The shortcut can be found from a group that was selected during the installation. The default Start menu group name is "RedLynx Trials 2 Second Edition".
4.2 Objective of the Game
There are four different track types in Trials 2 Second Edition.
Normal tracks. On normal tracks, the objective is to finish the track with as few faults as possible and in minimum time. Dynamic tracks. Dynamic tracks are like normal tracks, but they have dynamic objects that move when the bike hits them. Most dynamic objects are marked with a yellow-black checkerboard pattern. Flip tracks. On the Flips tracks your objective is to make as many flips as possible before finishing a track. A flip is a vertical 360 degree turn. There is a time limit in which you must proceed to the next checkpoint. The time limit can be seen in the upper right corner. Players are ranked in the Records by the number of faults and the number of flips. Wheelie tracks. Objective on the wheelie track is to drive as long as possible only on your back wheel. A little advice: When starting to drive hold arrow right key to raise your bike's front wheel. In the Records players are ranked by the number of faults and the total wheelie distance. Immediately after that try to balance your self in that position with all the arrow keys. 4.3 Playing with a keyboard
Controlling the Trials bike is simple. There are two alternative keysets that you can use for controls.
Keyset 1:
Keyset 2:
Other keys:
4.4 Playing with a game pad
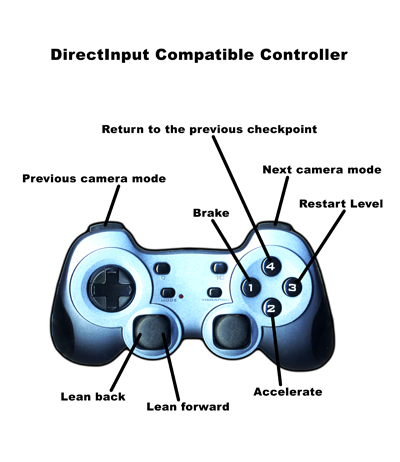
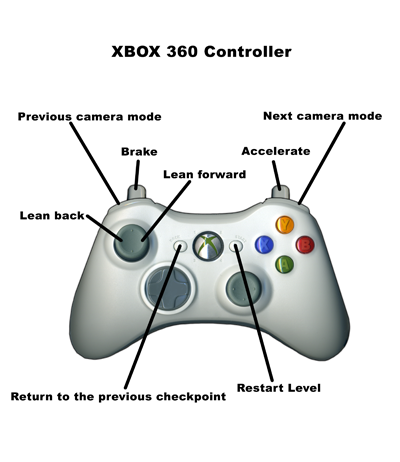
Trials 2 supports Microsoft DirectInput compatible game pads, that have at least 1 analog stick and at least 4 buttons.
The drivers for the pad must be installed before it will work.
The game detects the game pads, and no configuration is necessary.
Controls for DirectInput compatible pads:
Controls for XBox 360 pad:
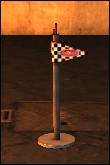
4.5 Checkpoints and GoalsCheckpoints appear as red flags on the map. If you make a fault, the game will automatically restart from the latest checkpoint cleared. Whenever you complete a checkpoint, a red pyro effect triggers. If you make a fault before the first checkpoint in a track, the game will restart from the beginning of the level, and the time and faults are reset. In other words, making a fault before the first checkpoint is the same as restarting the level. The goal is marked as a flag with a black and white checkerboard pattern. The track is finished when you reach the goal. A few seconds after finishing the track the high score screen will appear. 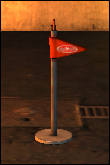
 4.6 Track statistics
While playing a track, statistics are shown in the top of the screen.
In the upper right corner of the screen, are statistics that affect your score. They depend on the track type. In the left corner of the screen, are statistics that do not affect your score and are shown for information only.
4.7 Records
When playing in online mode, the best results of each player for each track is saved into the global Trials 2 records list.
Records for each track can be viewed by clicking on "Records" in the main menu, or after finishing a track in the results screen. In the records screen, on the left side are listed the TOP 15 players for the track. On the right side, you can see your own position and the 7 players below and above you. There are three buttons after every high score entry. The buttons are in this order:
You can browse records from different levels. To change a level you'll have to press the button on the side of the level name on the upper side of the screen. Record types:
Time setting
4.8 Replays4.8.1 Saving replays
After you have finished a track, you can see your own replay by clicking "Show replay" in the results screen,
or you can save the replay by clicking "Save replay". You can also save your replay during the play
by selecting "Save replay" from the pause menu. The replay saved during the play will contain the play from
the start of the track to the moment when Pause was activated.
Your saved replays are saved to the "Trials 2 Replays" folder under your My Documents. You can send the replay files to your friend, and they can watch them by saving the file to their replay folder. The game will automatically list all replay files that are available in the folder. 4.8.2 Online replays
Whenever a player makes a record in the global highscore list, a recording of the play is sent along with the scores.
You can watch any replay from the highscore lists by clicking the Replay icon next to the record.
4.8.3 Watching replays
During a replay, in the lower right corner of the screen, you can see the keys that the player pressed while they were making their way through the track.
This enables you to learn from other players how to pass difficult tracks.
Also, you might want to try different camera angles to watch replays, they give a new perpective to the game. See chapter 4.10 for more info about camera angles.
4.9 Achievements
You will be awarded achievements when you fullfil the criteria for them.
You can see the list of achievements in the "Your stats" screen.
The achiements that you have gained are highlighted, and the ones that you don't have are grey.
You can see a description of the achievements by holding mouse cursor over the icon.
You can see others' achievements from their Player Profile.
In demo mode, you can get achievements, but they are not saved. Achievements will be reset when the game is restarted. 4.10 Camera Modes
During game play there are seven camera modes you can choose from. You can change the camera mode by pressing the "Camera mode". The button is located on the lower left corner of the screen. You can change the camera mode while playing or watching a replay.
Camera modes:
5. Profiles
Player profiles are not available in the demo mode.
5.1 Playing Offline
When playing in offline mode, the Profiles menu in the game is disabled. You can start playing without a profile by selecting "Start race" from the main menu.
5.2 Selecting active profile
When playing online, you can select a profile and create new profiles from the Profiles menu in the main menu. Click a profile name to select it as an active profile.
5.3 Viewing profile's position in High Score lists
On the left side of the Profiles screen you can see what positions in different tracks' record lists that profile has achieved. To update the list, click the Refresh button below the positions list.
5.4 Creating a New Profile
To create a new profile, click "NEW PROFILE" in the Profiles menu, enter the name of the new profile and press Enter. The name must be 3 to 10 characters long.
Because of global highscore lists, there can be only one Trials 2 profile with the same player name. If the name has been already taken by someone else, you will receive a notification. The profile name will have a red "unregistered" text next to it until it has been successfully registered.
5.5 Deleting a Profile
To delete a profile, click the profile name, click Delete and answer Yes to the confirmation question. When a profile is deleted, all highscores and replays created by that player will also be deleted from the server.
5.6 Playing Without a Profile
If you don't create a profile, the game will use an Offline profile.
6. Teams
Players can form teams that contain 1 to 10 players. Teams are not available in the demo mode.
6.1 Creating a Team
To create a new team, click Create New Team from the Manage Profile menu.
A name and password must be given for the team. Other players can join teams by using the name and the password.
6.2 Joining a Team
To join an existing Team, click Join team from the Manage Profile mnu.
6.3 Watching my team's members
To see the members of your team, go to Teams menu from the main menu.
6.3 Ranking of the teams
The rankings of the Teams can be seen from the Teams menu. The team's position is calculated using four best results of the team for each track.
If a team has less than four results for a track, only those results will be considered. Thus, the team can increase its rankings by playing at least four
scores for each track.
7. Chat
Chat is not available in the demo mode.
7.1 General
While chatting, please remember the following. Be polite to others and don't share any personal information or your Trials 2 license key to anyone.
Don't write comments that can be viewed as hate speech. RedLynx reserves the right to ban abusive users from the chat.
7.1 Joining a chat
You can chat with other Trials 2 players by choosing the Chat option from the main menu.
You're then connected to the Trials 2 chat, with your profile name being used as your nickname in the chat.
Please note that you need to be connected to the Internet to use the chat!
Once you're in the chat, you'll find that your nickname is the same as the name of your profile. If there are multiple people with the same name, a number will be added after your nickname. That participant's name is then marked in red, and all messages you type go to them. When you're done with your private chat, you can just click on their name again to deselect them 7.2 Private messages
You can also send private messages in chat by selecting the recipient from the user list in right. The selected recipient is marked as red.
When a recipient is selected, all typed messages will be private messages to that recipient.
Private messages appear as red on the screen and are only displayed to the sender and the recipient.
You can deselect the recipient by clicking it again. After deselecting the recipient the typed messages will be public.
7.3 Background chat
When you have finished chatting, you can either exit the chat completely by choosing choosing the Exit to Main Menu option,
or leave the chat open while playing. You can open the chat again anytime by pressing the Tab key.
8. Settings
The Settings screen can be opened by clicking on Settings from the main menu, or during the game when you pause the game by pressing the Esc key. Below is the list of settings and with explanations.
8.1 General settings
8.2 Settings for the Ultra-High Graphics Mode
The following settings are visible only when playing in Ultra-high graphics mode. Enabling any setting improves the image quality, but lowers the frame rate of the game as more processing power is required.
9. Uninstallation
To uninstall Trials2, select "Uninstall Trials 2 Second Edition" shortcut from the Windows Start Menu. The shortcut can be found from a group that was selected during the installation. The default Start menu group name is "RedLynx Trials 2 Second Edition".
10. Trials News & Upgrades
You can see the latest Trials 2 news at the main menu of the game.
A longer news list can be seen by selecting News from the main menu.
The Trials forum www.redlynxtrials.com/forum contains lots of additional information about the game, and also a discussion forum for Trials players. The game will automatically look for updates and prompt the user to install them. Please note that if you don't install the patches you might not be able to play online. This is to ensure that all online players have the same version, so that the game is fair for everyone. 11. Getting Help
If you have problems with Trials 2 Second Edition, please contact
support.
|


| Top players |
|---|
| # | Name | Ranking |
|---|---|---|
| 1 | AkaM | 6199.51 |
| 2 | Degn | 6198.88 |
| 3 | PrimusK | 6198.71 |
| 4 | Haruspex | 6198.24 |
| 5 | pebe | 6198.12 |
| Top teams |
|---|
| # | Name | Ranking |
|---|---|---|
| 1 | Simulacra | 24795.12 |
| 2 | Bitchslap | 24788.14 |
| 3 | Timeless | 24784.17 |
| 4 | Berrichons | 24772.54 |
| 5 | Shortcut | 24722.00 |
| Top countries |
|---|
| # | Name | Ranking |
|---|---|---|
| 1 | Finland | 61937.24 |
| 2 | United States | 61872.84 |
| 3 | France | 61864.30 |
| 4 | Germany | 61823.88 |
| 5 | United Kingdom | 61796.42 |
| Latest top scores |
|---|
| Date | Name | Track | Result |
|---|---|---|---|
| 2 h ago | Blegoman | Downloadable-4: Grindhouse | 00:48:68 |
| 2 h ago | Blegoman | Downloadable-3: Full Throttle! | 01:15:10 |
| 2 h ago | Blegoman | Downloadable-2: Death Slopes | 00:18:78 |
| 2 h ago | Blegoman | Downloadable-1: Autobahn | 00:27:18 |
| 2 h ago | Blegoman | Dynamic 4: Step Up! | 01:57:40 |
| Active players | 194873 |
|---|
See more statistics.